Kitchen Remodeling: Infographics You Need to See


Are you planning to give your kitchen a much-needed facelift?
Kitchen remodeling is not only a visually appealing and cost-effective way to spruce up your space, it can also add value to your home.
With so many decisions to make and decisions to make, it can seem overwhelming.
According to the National Kitchen and Bath Association, the average kitchen renovation costs over $23K, so it's worth taking the time to make sure you're not wasting your money.
Fortunately, we have the perfect solution: a collection of informative and visually-appealing infographics!
Infographics can be a helpful tool when planning a kitchen remodeling project.
They provide a visual representation of the various options available for layout, design, and materials.
This can help homeowners make informed decisions about what will work best for their space and budget.
Additionally, infographics can provide tips and tricks for maximizing storage and functionality in the kitchen.
Infographics for kitchen remodeling can be incredibly helpful in simplifying the process of organizing various tasks involved in the renovation.
With the right information at their fingertips, homeowners can feel confident in their choices and create a kitchen that meets their needs and style preferences.
With clear and concise visuals, homeowners can easily understand the steps involved in the remodeling process and stay on track with their project timeline.
Whether you're a seasoned DIYer or you plan to hire a professional, these resources make it easy to upgrade your kitchen in style.
From the ultimate kitchen remodeling checklist to popular kitchen layouts, find out how to create the perfect kitchen for your home.
So grab your toolbox and get ready – it's time to create a kitchen you'll love!


Multifunctional kitchen countertop designs by DECORILLA designer, Marya W.

You will also enjoy these articles:


The Ultimate Kitchen Remodeling Checklist.
Get the inside scoop with our Ultimate Kitchen Remodeling Checklist.
Our informative infographic covers all the crucial steps, from setting a budget to planning and demoing.
Whatever your project goals, this checklist will help you stay organized and achieve results you'll love!


Start your remodel on the right foot by setting a budget, then create a design plan to reflect your style and preferences.
Think about the layout, color scheme, and materials you want to use — including countertops, flooring, and backsplash — as well as storage space, lighting, and traffic flow.
Don't forget to pick energy-efficient appliances too!
With the right planning and information, you can tackle this project with confidence and create a dream kitchen you'll love.

Luxury traditional kitchen by DECORILLA
Seven Signs That Your Kitchen Needs to Be Renewed

Transforming your kitchen into a space that's not only functional but also a joy to spend time in can be an exciting journey. Here are seven unmistakable signals that your kitchen is pleading for a makeover:
Feeling the Squeeze in a Tight Kitchen Layout
When your kitchen starts to feel more like a tight squeeze than a roomy retreat, it's time to think about breaking down barriers.
Adopting an open floor plan can miraculously expand your space, fostering a welcoming atmosphere where socializing becomes as effortless as breathing.
The Dreaded Clean-Up in Your Existing Kitchen
Battling with stubborn stains and unreachable corners shouldn't be a daily ordeal.
Embrace countertops that defy messes, appliances that clean in a snap, and floors that refuse to hold onto grime.
These upgrades promise a kitchen that's less about cleaning and more about living.
After we did a minor remodel to our kitchen, I would say, “Even cleaning in this kitchen is fun!”
Counterproductive Countertop Chaos
A cluttered countertop is a recipe for frustration.
Streamlining your space not only clears the path for culinary masterpieces but also sets the stage for meaningful moments, free from the clutter of the day.
Echoes of the Past in an Outdated Kitchen
If your kitchen starts to resemble a scene from a spooky tale, with its creaky cabinets and appliances that seem to have a life of their own, it's a clear call for renewal.
A refresh can rekindle the warmth and charm that once made your kitchen the heart of your home.
The Endless Hunt for Kitchen Tools
If finding a spatula feels like a treasure hunt, it's time to rethink your storage strategy.
A kitchen makeover can transform chaos into order, ensuring everything you need is right at your fingertips.
Shadows and Sighs
A dimly lit kitchen can dampen even the brightest spirits.
Illuminating your workspace with layered lighting can chase away the shadows, making your kitchen a place where joy and creativity shine.
Navigational Nightmares
If moving around your kitchen feels like a game of bumper cars, it's time for a layout revamp.
Designing a kitchen that accommodates the dance of cooking without stepping on toes can turn meal prep into a performance worth applauding.
Acknowledging these signs and taking steps towards change can usher in a new era for your kitchen—a sanctuary for delicious meals, laughter, and life's little moments.
The Kitchen Remodeling Process
Embarking on a kitchen transformation journey is no small feat, yet the rewards of crafting a space that resonates with your essence and caters to your needs are immeasurable.
Laying the Groundwork
Identifying Your Vision:
What sparks this desire for change?
Is it the quest for enhanced functionality, a yearning for a touch of elegance, or perhaps the aim to boost your abode's market value?
Recognizing your objectives is the cornerstone of this design adventure, guiding your decisions on the project's breadth and financial planning.
Related Reading:
Seeking Inspiration:
Dive into the vast sea of magazines, websites, and social platforms to fish for ideas that speak to you.
Reflect on your daily life and prioritize kitchen features that promise convenience and joy.
Related Reading: How to use Pinterest to create your dream home
Budgeting with Care:
The financial spectrum of kitchen makeovers is broad, stretching from modest to grandiose investments.
Setting a budget upfront is crucial to navigate this renovation endeavor without financial strain.
Drafting the Blueprint:
Envision your kitchen's layout and cherry-pick the materials that will bring your dream to life.
Related Reading: 101 Most Commonly Used Interior Design Terms and Phrases
Choosing the Right Partner:
Solicit proposals from at least three contractors, meticulously vetting their credentials and track record.
The Construction Phase
The Big Tear-Down:
The initial phase involves dismantling your current kitchen setup. Brace yourself for the upheaval.
Laying the Infrastructure:
This stage sees the shaping of your kitchen's backbone through electrical, plumbing, and HVAC installations.
Bringing It All Together:
Following the groundwork, your chosen cabinets, countertops, appliances, and fixtures find their place.
The Final Flourishes:
The addition of backsplashes, flooring, and other accents mark the nearing end of the physical transformation.
Crossing the Finish Line
The Official Nod:
A city inspector will scrutinize the renovation to ensure compliance with building codes.
The Final Review:
Take a detailed walkthrough with your contractor to ensure every detail aligns with your vision.
Sealing the Deal:
Satisfied with the outcome? It's time to make the last payment to your contractor.
Words of Wisdom
Embrace Flexibility:
Remodels are notorious for unexpected twists.
Stay open to tweaking your plans, whether it's the budget, timeline, or design.
Stay in Touch:
Maintaining clear, continuous communication with your contractor is key.
Voice your concerns and queries without hesitation.
Savor Your New Realm:
With the project behind you, it's time to revel in the fruits of your labor.
Whether it's hosting a dinner party, experimenting with recipes, or simply basking in the beauty of your new kitchen, enjoy every moment.

Elevating Your Home: The Advantages of Kitchen Upgrades

Your kitchen, the heart of your home, holds a special place in your daily life.
From those tranquil morning coffee moments to bustling family dinners, it's a space that brings everyone together and nourishes the soul.
If your kitchen feels like it's stuck in another era, it might be time to think about the wonderful benefits a remodel could bring.
Here's why giving your kitchen a facelift is a savvy move:
Make Lasting Impressions with a Kitchen Update
We all know that first impressions count, and your kitchen is no exception.
Breath new life into your space with fresh cabinets, a smarter layout, updated flooring, chic countertops and improved lighting.
The beauty of your revitalized kitchen will spill over into your entire home, leaving a positive, lasting impression on all who enter.
Enhance Comfort and Convenience with a Kitchen Renovation
Picture transforming your kitchen into a cozy sanctuary of comfort and convenience.
A well-designed kitchen doesn't just make cooking easier—it sets the stage for relaxation and connection.
From effortlessly hosting gatherings to elevating your culinary adventures, a comfortable kitchen enriches your daily life.
Boost Home Value with a New Kitchen Design
Investing in your kitchen isn't just about making your life better—it's about boosting your home's value too.
Studies show that even a minor kitchen remodel can recoup over 80% of its costs, while a major one can retain over 65% upon resale.
With a refreshed kitchen, you'll not only enjoy your space more but also increase its appeal to future buyers.
Embrace Energy Efficiency by Renovating Your Kitchen
Today's kitchen appliances and features often come with energy-efficient ratings, helping you reduce your carbon footprint and your utility bills.
By upgrading your kitchen, you can embrace eco-friendly practices while saving energy and money—an all-around win for your household and the planet.
Revitalize Your Kitchen, Elevate Your Lifestyle
Your kitchen is more than just a place to cook—it's the heart of your home, where memories are made and cherished.
Revamping your kitchen doesn't just improve its appearance—it enhances your comfort, increases your home's value, and promotes sustainability.
Embark on the journey to upgrade your kitchen, and watch as your home transforms into a more inviting, efficient, and valuable haven for you and your loved ones.

Budget Breakdown for Your Kitchen Remodel

The investment required for a kitchen makeover can fluctuate greatly, influenced by variables such as geographic location, kitchen dimensions, choice of materials, and your own unique tastes.
Below is a rough sketch of how your renovation budget might be apportioned across various categories:
Design (4-8% of total budget):
This slice of the budget is allocated for design fees, consultations, and the meticulous planning of your kitchen's layout.
Appliances and Ventilation (10-15% of total budget):
This portion covers the acquisition of essential appliances like the oven, stove, refrigerator, dishwasher, as well as the range hood and ventilation mechanisms.
Lighting (5-10% of total budget):
This part funds the implementation of ambient, task, and accent lighting, encompassing both the lighting fixtures and the necessary electrical work.
Walls and Ceiling (2-5% of total budget):
Allocated for the embellishment and repair of walls and ceilings, including painting, wallpapering, and other treatments.
Faucets and Plumbing (4-7% of total budget):
Dedicated to the purchase and installation of faucets, sinks, plumbing fixtures, and any required plumbing adjustments.
Countertops (10-15% of total budget):
This budget segment is reserved for the costs associated with acquiring and installing countertop materials such as granite or quartz.
Cabinetry and Hardware (25-35% of total budget):
A significant portion earmarked for selecting and fitting either custom or stock cabinets, inclusive of the hardware and installation fees.
Flooring (7-10% of total budget):
Funds the selection and installation of flooring materials, whether it be tile, hardwood, or laminate.
Installation (15-20% of total budget):
Covers the labor costs associated with the general construction and installation of cabinets, appliances, and other kitchen elements.
Other (5-10% of total budget):
Accounts for miscellaneous expenses, unforeseen costs, permits, and any extra features or components you wish to include.
Remember, these figures serve as a ballpark guide and can shift depending on the specifics of your project. Collaborating closely with your contractor and design team is crucial to formulating a comprehensive budget that truly reflects the scope and aspirations of your kitchen transformation.

Kitchen Features Rated Essential or Desirable

In the ever-evolving landscape of kitchen design, certain features have risen to prominence, coveted by homeowners aiming to sculpt their ideal culinary arenas. These components not only boost the kitchen's practicality but also elevate its visual charm.
Drawing from an extensive survey, the following are the top kitchen attributes that have captured the hearts of many, presented along with the percentages of respondents who view them as indispensable or highly appealing:
Double Sink (Side by Side) - 81% Essential/Must Have
81%: Leading the pack, the double sink is celebrated for its role in streamlining meal preparation and cleanup, with
42% labeling a double sink as indispensable
and another 39% appreciating its handy nature.
Walk-In Pantry - 81% Essential/Must Have
The walk-in pantry stands out as a bastion of order at 81%, with
34% considering a walk-in pantry crucial for a tidy kitchen environment and
47% valuing a walk-in pantry’s convenience for storing essentials within arm's reach.
Table Space for Eating - 78% Essential/Must Have
The inclusion of a flexible dining spot is cherished as 78% consider it a must have, with
35% regarding it as vital for hosting family gatherings
and 43% liking it for casual dining experiences.
Central Island - 77% Essential/Must Have
The central island is admired by 77% for its dual role in providing extra workspace and storage,
seen as indispensable by 32% and
desirable by 45% for its adaptability.
Drinking Water Filtration - 76% Essential/Must Have
The quest for purity makes water filtration systems a priority, with
32% finding them essential for clean drinking water and
44% appreciating the assurance they offer.
Granite/Natural Stone Countertop - 73%
The allure of granite or natural stone countertops is undeniable, with their elegance and resilience essential to 26%
and appealing to 47% for adding a touch of luxury.
Recessed Lighting - 69%
Recessed lighting is favored for its ability to cast a soft, even glow, deemed essential by 26% for optimal illumination
and desirable by 43% for creating a warm ambiance.
Customized Backsplash - 69%
A personalized backsplash captures attention for adding a unique visual element, with 23% considering it a must-have
and 46% finding it an attractive option for customization.
Pull Out Shelves - 68%
The convenience of pull-out shelves is acknowledged, with 22% viewing them as crucial for accessibility
and 46% appreciating their role in keeping things organized.
Breakfast Bar - 64%
The breakfast bar is appreciated for encouraging social interaction, essential to 19% for swift meals
and desirable to 45% for laid-back dining.
These sought-after features signify a blend of practicality and style, mirroring the dynamic preferences and lifestyles of today's homeowners, as they strive to create kitchen spaces that are not only efficient but also a joy to inhabit.
Design Guidelines for the Kitchen

Source: Pinterest via ThisOldHouse.com
A thoughtfully arranged kitchen is key to balancing both efficiency and safety, with strategic placement of appliances, cabinets, and countertops playing a pivotal role.
Adhere to these design principles to forge a space that's as harmonious as it is practical:
Standard Hanging Cabinet Depth:
Aim for a depth of 12 inches for upper cabinets to maximize storage without compromising the kitchen's streamlined look.
Island and Pendant Placement:
For an inviting ambiance, keep a standard distance of 30 inches between the island and pendant lighting, creating an appealing visual balance.
Island Height Variations:
Depending on seating type, aim for an island height of 36 to 42 inches, catering to comfort and versatility for both dining and meal preparation.
Stool and Countertop Spacing:
Allow a comfortable 10-inch distance between stools and countertops, ensuring ease of movement and a relaxed dining experience.
Optimal Cabinet-Island Gap:
Create ample working room by maintaining an ideal 48-inch distance between cabinets and the island, facilitating smooth movement for two cooks.
Standard Countertop Height:
Maintain a standard height of 36 inches for countertops, promoting ergonomic cooking and prep activities.
Effective Hood Placement:
Ensure optimal ventilation by choosing a hood depth that covers at least half of the front burner area, enhancing air circulation and eliminating cooking odors.
Vent Hood Overhang:
Allow a 3-inch overhang of the vent hood on either side of the range, effectively capturing smoke and steam for efficient exhaust.
Cooktop to Vent Hood Distance:
Maintain a distance of 24 to 36 inches from the cooktop to the bottom of the vent hood, adjusting based on range size and type for maximum functionality.
Strategic Prep Station:
Create an ideal prep station adjacent to the range, with a recommended 36-inch space, streamlining cooking tasks and ingredient preparation.
Minimum Landing Area:
Ensure a practical workspace by providing a minimum of 12 inches of landing area next to the range, allowing for convenient placement of utensils, ingredients, and cookware.

Source: Pinterest via ThisOldHouse.com
Banquette Design:
Ideal Banquette Back Angle:
Achieve comfort with a backrest angle of 12 degrees for your banquette seating.
Recommended Seat Dimensions:
Allow each adult a comfortable seat width of 24 to 30 inches, ensuring a relaxed dining experience.
Bench Depth:
Optimal bench depth stands between 18 to 20 inches, striking a balance between comfort and space efficiency.
Bench Height:
Incorporate cushions into your design by maintaining a bench height of 18 inches, offering both comfort and style.
Table Height:
Set your banquette table at a height of 28 to 30 inches, facilitating enjoyable dining moments.
Breakfast Bars and Islands:
Proper Overhang for Comfort:
When designing seating for breakfast bars and islands, remember that different heights require varying overhangs.
For a 42-inch high island, allow 12 inches of overhang;
for a 36-inch high island, provide 15 inches;
and for a 30-inch high island, allocate 18 inches for knee space.
Countertop and Sink Considerations:
Wall-Mounted Cabinets:
Maintain a practical distance of 15 to 18 inches between your countertop and wall-mounted cabinets for optimal functionality.
Landing Area Next to Sink:
Ensure a convenient workspace by providing an 18-inch width of landing area next to the sink, making meal prep and cleanup seamless.
Sink Height:
Elevate user comfort by setting the sink height between 29 to 36 inches, accommodating different user preferences.
Sink-Dishwasher Space:
Allow a maximum distance of 36 inches between the sink and dishwasher, streamlining your dishwashing process.
Microwave and Light Switch Placement:
Microwave Height:
Position your microwave at a comfortable height of 54 inches or about 3 inches below your shoulder level for effortless access.
Light Switch Placement:
Optimize functionality by placing light switches at a height of 44 to 48 inches, ensuring easy access and control.
By adhering to these design guidelines, you can transform your kitchen into a well-organized and efficient space that seamlessly blends functionality and aesthetics, enhancing your culinary experience.

Exploring the Advantages and Drawbacks of Popular Kitchen Cabinet Colors

Elegant White Cabinets:
Pros: White exudes timeless charm, staying immune to trends; offers a pristine and immaculate aura to your kitchen.
Cons: Vulnerable to showing dirt and stains; some perceive white as lacking excitement and originality.
Luxurious Black Cabinets:
Pros: Elevates your kitchen's allure with an air of opulence and individuality; adds a touch of uncommon sophistication.
Cons: Prone to appearing dirty, even when clean; dark hues tend to visually constrict smaller spaces.
Spacious Cream Cabinets:
Pros: Cream tones create an illusion of expanded space; resist showing fingerprints and smudges.
Cons: Demands diligent cleaning efforts to maintain its lustrous appearance.
Stylish Grey Cabinets:
Pros: Encompasses contemporary style, aligned with current trends; introduces a modern flair.
Cons: Can inadvertently shrink the perceived size of your kitchen area.
Timeless Natural Wood:
Pros: Classic aesthetics evoke warmth and authenticity; a perennial favorite.
Cons: Natural tones might accentuate wood flaws and imperfections.
By scrutinizing these facets of popular kitchen cabinet colors, you'll be better equipped to make an informed decision that harmonizes with both your style preferences and practical considerations.
Elevating Your Kitchen: Revamp Your Cabinets with Confidence

Your kitchen's allure hinges significantly on the state of your cabinets, making them a pivotal focal point that resonates long after guests depart.
Should your cabinets appear worn and dated, the time might be ripe for a rejuvenating transformation.
Navigating Cabinet Upgrade Options:
Embrace Refacing:
Looking to refresh your kitchen's aesthetics without an extensive overhaul?
Cabinet refacing is your strategic solution.
This approach involves replacing cabinet doors and drawer fronts while enveloping face frames in your chosen veneer or stain.
In essence, it's akin to giving your cabinets a new skin.
A budget-conscious option, refacing trims expenses by up to 30%-50% compared to complete replacement.
Diverse designs and colors empower personalization, and collaborating with proficient refacing professionals guarantees quality results.
Opt for Replacement:
While refacing shines in many scenarios, replacement becomes the go-to when cabinets exhibit considerable damage or structural issues.
If you're contemplating a layout transformation or your cabinets are deteriorating, opting for replacement might be the ideal route.
Expert installers ensure meticulous base cabinet placement, vital for maintaining level counters and preventing unruly edges.
With a cost range of $12,000-$20,000, contractor-grade cabinets can grace your revitalized kitchen space.
Revel in Painting:
A surge in popularity awaits those who prefer a DIY approach.
Painting cabinets offers an economical, time-efficient alternative, with potential savings of 60%-70% compared to full-scale remodeling.
However, it requires a keen understanding of surface preparation and proper paint selection.
Tackling laminate fronts necessitates caution, as improper techniques can lead to subpar outcomes.
Engage a reputable contractor for guidance and expert execution to ensure an impeccable finish.
Choosing Your Ideal Path:
Refacing: An economical facelift with customizable designs.
Replacement: For substantial repairs, layout changes, or complete transformations.
Painting: DIY-friendly cost savings, ideal for certain surfaces and skill sets.
Ultimately, your choice hinges on the condition of your cabinets, desired outcome, and your readiness to undertake the project. Engaging with experts streamlines the process, ensuring your kitchen's transformation resonates with enduring elegance.

Designer: Sandra Gsejdahl via The Detroit News
How to Choose the Right Countertop for Your Kitchen
Kitchen remodeling often highlights the importance of creating more countertop space.
This can be achieved through various design elements such as adding an island, extending the existing countertops, or choosing a more efficient layout.
Having ample countertop space not only makes cooking and meal prep easier, but it also adds value to the overall functionality and aesthetics of the kitchen.

Source: Fernandez Designs
Choosing the right countertop for your kitchen can be a daunting task, but it's an important decision that can greatly impact the overall look and functionality of your space.
Kitchen Countertop Shapes
1.Rounded Countertop:
Rounded countertops are elegant and versatile, and they can be a great choice for small kitchens.
The curved edge can provide a soft contrast to the hard lines of cabinets and appliances. Place the functional items, like the sink, on the flat end of the countertop, and a few chairs around the curve for casual dining.

2. Multi-Tier Countertop:
Multi-tier countertops are a great way to maximize space in a small kitchen.
The two levels can be used for different purposes, such as cooking and eating.
The lower level can be used for food prep and the upper level can be used for serving and dining.

3. Triangular Countertop:
Triangular countertops are a unique and eye-catching option for kitchens with limited space.
They can be used as a breakfast bar or as an extension of the kitchen island.

Architect: John Cole, John Cole Architect, Arlington, Mass., and Freyburg, Maine, johncolearchitect.com
Builder: Island Cove Building & Development, Raymond, Maine, islandcovebuilding.com
Photo: Brian Vanden Brink, brianvandenbrink.com
From Fine Homebuilding #287
4. Curved Countertop:
Curved countertops are a great way to add interest and personality to a kitchen.
They can also help to create a more spacious feel.
If you're looking for a statement piece for your kitchen, a curved countertop is a great option.

Designer Peter Salerno; Photo by Peter Rymwid
5. L-Shaped Countertop:
L-shaped countertops are a practical and efficient option for small kitchens.
They provide plenty of workspace and storage space, and they can be used to create a U-shaped kitchen layout.

Phoenix Quartz via Pinterest
6. Stepped Countertop:
Stepped countertops are a great way to add visual interest to a kitchen.
They can also be used to create different levels of functionality, such as a lower level for food prep or for seating.
One such example is this blue kitchen island from Home Depot.

Key takeaways on kitchen countertop shapes:
1. There are several shapes to choose from when selecting a kitchen countertop.
2. Rounded, multi-tier, triangular, curved and L-shaped countertops are all viable options.
3. Stepped countertops can be used to make a statement and provide additional levels of functionality.
Kitchen Countertop Materials
Consider factors such as durability, maintenance, and style when selecting a countertop material.
1. Marble:
Marble is a classic and elegant material that is perfect for kitchens with a traditional or luxurious look.
It is available in a variety of colors and patterns, and it can be polished to a high shine.
Marble is also a very durable material, but it can be susceptible to staining and etching.

Source: Michael Moran/OTTO via Architectural Digest
2. Granite:
Granite is another popular choice for kitchen countertops.
It is available in a wide range of colors and textures, and it is very durable.
Granite is also resistant to stains and etching, making it a good choice for busy kitchens.
Source: Davida's Kitchen & Tiles via The Spruce
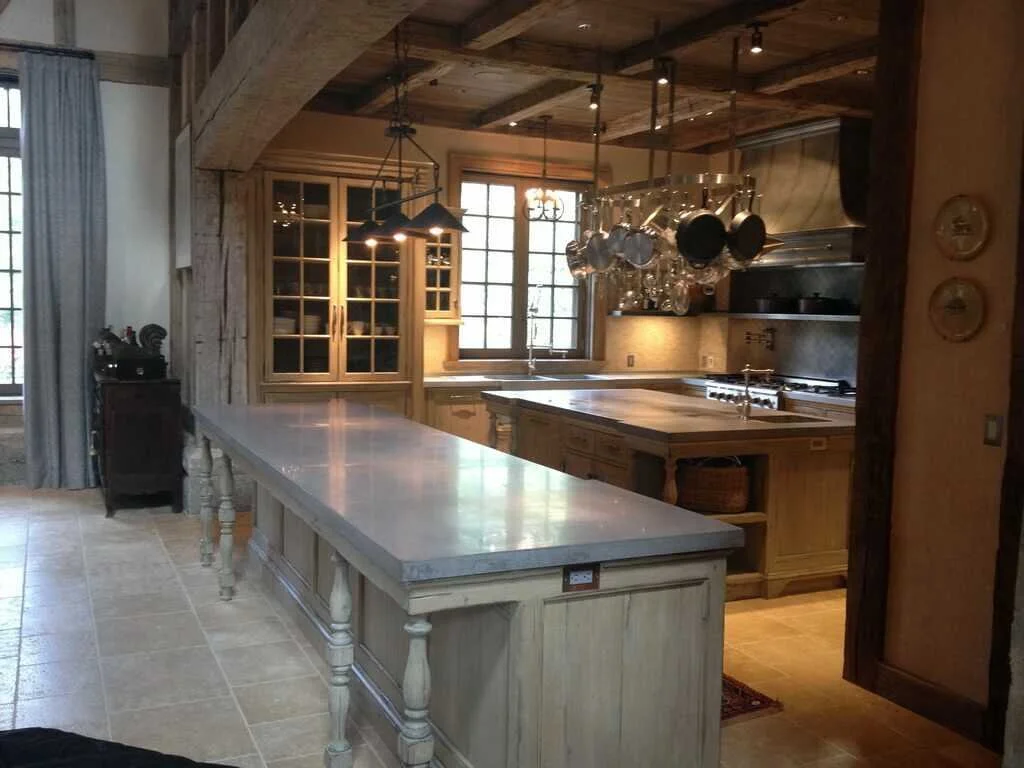
3. Concrete:
Concrete is a unique and modern material that can add a touch of industrial style to a kitchen.
It is also very durable and can be customized to create a truly unique look.
Concrete countertops can be stained or painted to achieve the desired color and finish.
4. Soapstone:
Soapstone is a natural stone that is known for its non-porous properties.
This makes it a very sanitary material that is resistant to staining and bacteria.
Soapstone is also very durable and can be easily repaired if it is damaged.
Soapstone countertops are typically darker in color than other types of countertops, and they can develop a beautiful patina over time.

CROCODILE ROCKS via How Stuff Works
5. Butcher Block:
Butcher block countertops are made from solid wood, and they offer a warm and rustic look.
They are also very durable and can withstand heavy use. Butcher block countertops require regular maintenance, such as oiling or waxing, to protect them from moisture and staining.

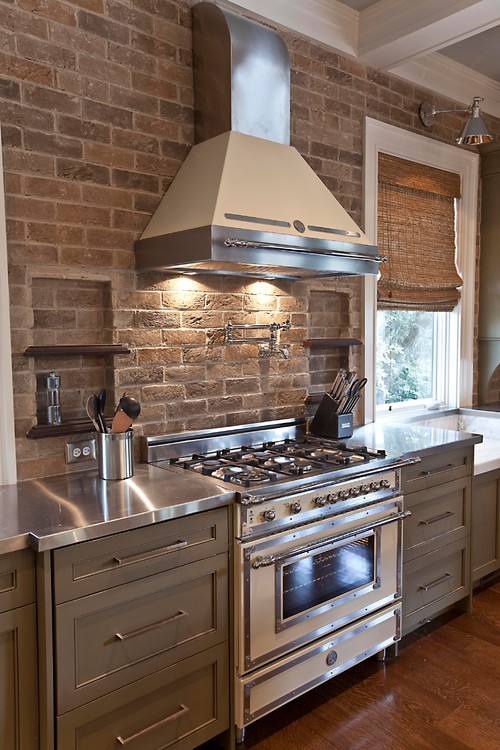
6. Stainless Steel:
Stainless steel countertops are a popular choice for kitchens with a modern or industrial look.
They are very durable and easy to clean, making them a good choice for busy households.
Stainless steel countertops can also be customized to create a unique look.
Eco and Budget- Friendly Countertop Options
Granite, quartz, and marble are popular options, but there are also eco-friendly and budget-friendly alternatives available.
When it comes to choosing a countertop for your kitchen remodel, there are several factors to consider.
First and foremost, you want a material that is durable and can withstand daily wear and tear.
Granite, quartz, and marble are all popular choices for their durability and natural beauty.
However, they can also be expensive and require regular maintenance.
If you're looking for a more budget-friendly option, consider laminate or solid surface countertops.
These materials are easy to clean and come in a variety of colors and patterns.
For those who are eco-conscious, there are also sustainable options such as bamboo and recycled glass.
Use the infographic above to compare the pros and cons of each material and find the perfect countertop for your kitchen remodel.
Choosing the right countertop for your kitchen can be overwhelming, but this infographic breaks down the pros and cons of each material to make the decision easier.
Granite is a popular choice for its durability and natural beauty, but it can be expensive and require regular maintenance.
Quartz is another durable option that is low-maintenance and comes in a variety of colors and patterns.
Marble is a luxurious choice, but it is also the most high-maintenance and prone to staining.
Laminate and solid surface countertops are budget-friendly and easy to clean, but they may not be as durable as other materials.
For those who are eco-conscious, bamboo and recycled glass are sustainable options that offer unique textures and patterns.
Key Takeaways on countertop materials:
1) Popular kitchen countertop materials include granite, quartz, marble, concrete, soapstone, butcher block, and stainless steel.
2) Granite is durable with a variety of colors and textures, while quartz is low-maintenance and more budget-friendly.
3) Sustainable options like bamboo and recycled glass offer unique textures and patterns.

Tips for Maximizing Storage in Your Kitchen

Source: Mr. Cabinet Care
One common issue with kitchens is overstuffed storage, making the space appear smaller than it actually is.
One of the biggest challenges in kitchen remodeling is finding enough storage space for all your cookware, utensils, and appliances.
This is why it's important to carefully plan and prioritize storage solutions during the remodeling process, to ensure that the kitchen remains functional and spacious.
Infographics can be a helpful tool for visualizing different storage options and layouts, and can assist in making informed decisions about the best ways to optimize kitchen space.
This infographic offers tips and tricks for maximizing storage, including utilizing vertical space, incorporating pull-out shelves and drawers, and using multi-functional furniture.
With these ideas, you can create a kitchen that is both beautiful and functional.
The first step in maximizing storage in your kitchen is to assess your current space and identify areas that are underutilized.
Look for empty walls, corners, and gaps between appliances where you can add shelves, hooks, or racks.
Vertical space is often overlooked, but it can be a great place to store items like pots and pans, cutting boards, and baking sheets.
Maximize storage space with vertical and horizontal solutions such as wall-mounted grocery bag dispensers, stackable shelves, and pan organizers underneath the sink.
Invest in kitchen organizers such as wire shelving, inserts, and pegboards to store canned goods, cutleries, and pots.
Use some of the more inexpensive options as well.
Repurpose magazine holders for spices and get creative by using old tension rods and towel bars to hang spray bottles or for hand towels.
Pretty baskets and containers can come in handy for organizing, too.
Another way to maximize storage in your kitchen is to invest in multi-functional furniture and appliances.
For example, a kitchen island with built-in storage can provide extra counter space and drawers for utensils and cookware.
A pull-out pantry can also be a great addition, as it allows you to store a large amount of food in a small space.
Finally, don't forget about the power of organization.
Use drawer dividers, shelf risers, and labeled containers to keep everything in its place and make it easy to find what you need.
With these tips, you can make the most of your kitchen space and create a functional and organized cooking area.
If you're planning a kitchen remodel, maximizing storage should be at the top of your list.
One way to do this is to take advantage of vertical space by installing tall cabinets or shelving units.
You can also add hooks or racks to the inside of cabinet doors for extra storage.
Another option is to use pull-out shelves or drawers in lower cabinets to make it easier to access items in the back.
Additionally, consider using open shelving or glass-front cabinets to display your favorite dishes or cookware while also freeing up cabinet space.
Key takeaways:
1) Take advantage of vertical space by installing tall cabinets or shelving units.
2) Use pull-out shelves or drawers in lower cabinets to access items in the back.
3) Incorporate multi-functional furniture such as a kitchen island with built-in storage.
The Pros and Cons of Different Kitchen Flooring Options
From hardwood to tile to vinyl, we’ll break down the benefits and drawbacks of each material, so you can choose the flooring that best suits your needs.
Whether you’re looking for durability, style, or affordability, there’s a kitchen flooring option out there that’s perfect for you.
So take a look at this infographic and start planning your dream kitchen today!

Source: The Nordroom
Choosing the right flooring for your kitchen is an important decision that can impact the overall look and feel of the space. ]
When it comes to kitchen flooring, there are several options to choose from, each with their own advantages and disadvantages.
Tile
Tile floors are another popular option, as they are easy to clean and come in a variety of styles.
Tile may require professional installation.
Ceramic tiles are a popular choice for kitchen flooring due to the wide range of options, extreme durability, non-allergenic properties, and reasonable price.
However, they are known to be cold and heavy and can be prone to stains.
Another option is porcelain tile, which is easy to maintain and offers many style options, but is often more expensive and hard and cold to the touch.
Terracotta
Terracotta flooring is a great choice for its durability as well as its warm look, but keep in mind that terracotta is porous and will require additional sealant.
Stone
Natural stone is easy to clean, adds character to a kitchen, and is extremely durable, but it is also very hard and expensive.
Concrete
Concrete is a durable option with a reasonable cost, but it is very cold and slippery when wet, and sensitive to moisture.
Vinyl
Vinyl flooring is a budget-friendly option that is easy to install and comes in a variety of colors and patterns.
However, it may not be as durable as other options and can be prone to fading over time.
Vinyl flooring is an excellent choice due to its wonderful durability, water-resistance, and price, but it does not add value to the home and can be difficult to remove.
Hardwood
Hardwood floors add value to any home.
Hardwood floors are a popular choice for their durability and warm, natural look.
However, they can be prone to scratches and water damage, and may require regular maintenance.
Terrazzo
Lastly, terrazzo is a unique and durable surface that is also water-resistant, but it comes with a steep price tag and can be slippery.
Ultimately, the best flooring option for your kitchen will depend on your lifestyle, budget, and design preferences.
Key takeaways on kitchen flooring:
1. All types of flooring have pros and cons that should be weighed when making a decision.
2. Flooring choices vary depending on factors such as durability, style, and affordability.
3. It is essential to consider the pros and cons of each type of flooring before making a purchase.
Top Trends in Kitchen Design for 2023-2024

As we head into 2024, there are several exciting trends in kitchen design that are worth considering for your next remodel.
Trending Oversized Windows
One popular trend is the use of a sink under an oversized window, which is popular in kitchen design.
Large windows let in as much natural light as possible, which makes the kitchen feel brighter and more inviting.
They also provide a view of the outdoors, which can be relaxing and enjoyable while cooking.

Trending Brass Latches
The latches on the cabinets are another trend in kitchen design.
They are a great way to keep the cabinets closed and prevent them from swinging open accidentally.
This is especially important in kitchens with small children or pets. The latches can also be used to create a more custom look for the kitchen.
In addition to the large windows and latches, the image above also shows some other popular kitchen design trends. The white cabinets are a classic choice that never goes out of style.
The farmhouse sink is a rustic touch that adds character to the kitchen. And the brass hardware gives the kitchen a touch of luxury.
Overall, the image shows a kitchen that is stylish, functional, and inviting. It is a great example of how to incorporate two popular kitchen design trends into one space.
Here are some additional details about the image that you may find helpful:
The window is made of clear glass, which allows in the maximum amount of natural light.
The latches on the cabinets are made of brass, which matches the hardware on the sink and faucet.
The cabinets are painted white, which is a neutral color that goes with any style of décor.
The farmhouse sink is made of fireclay, which is a durable and long-lasting material.
The brass hardware on the sink and faucet adds a touch of luxury to the kitchen.
Keep these trends in mind as you plan your dream kitchen remodel.
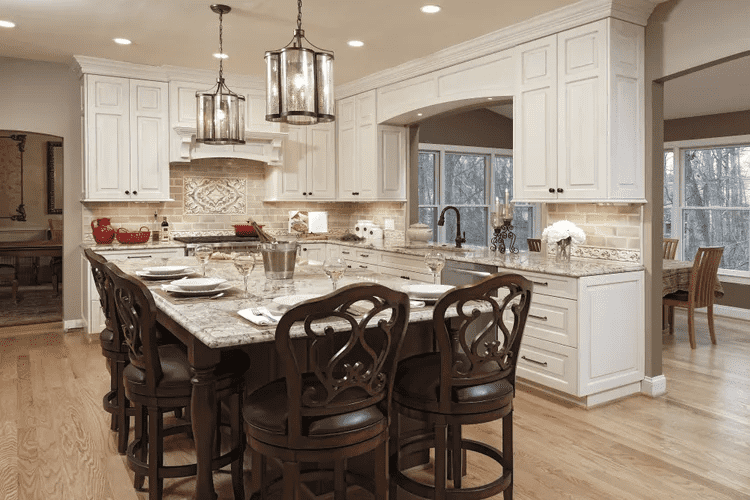
Trending Double Islands
Double islands add a touch of luxury and sophistication to any kitchen, and they can be used for a variety of purposes.
The larger island in the image is perfect for cooking and baking, while the smaller island can be used for seating, prep work, or storage.
The two islands also create a sense of separation in the kitchen, which can be helpful for large families or groups of people.

In addition to being stylish, double islands are also very functional.
They provide plenty of work space, storage, and counter space. They can also be used to create a more open and inviting feel in the kitchen.
If you're looking for a way to update your kitchen with a touch of luxury and sophistication, double islands are a great option.
Here are some of the benefits of using double islands in kitchens:
They add a touch of luxury and sophistication to any kitchen.
They can be used for a variety of purposes, such as cooking, baking, seating, prep work, or storage.
They create a sense of separation in the kitchen, which can be helpful for large families or groups of people.
They provide plenty of work space, storage, and counter space.
They can create a more open and inviting feel in the kitchen.
If you're considering adding double islands to your kitchen, be sure to measure your space carefully to make sure they will fit properly.
You'll also need to decide what materials you want to use for the islands and countertops. Once you have everything planned out, you can start enjoying your new double islands!
Trending Green Cabinets

This is a current design trend that is making a comeback.
Green kitchen cabinets are a versatile and stylish option that can be used in a variety of ways.
They can be painted in a variety of colors and styles, and they can be installed in a variety of ways.
Green cabinets are a great way to add a pop of color and personality to your kitchen.
They are also a great way to add a touch of nature to your home.
In the images above, we can see three different shades of green used for the cabinets.
The first kitchen has a light green color that is reminiscent of springtime.
The second kitchen has a darker green color that is more reminiscent of the forest.
The third kitchen has a teal green color that is a bit more playful.
Trending Smart Appliances

The next trend deals with the latest advances in smart appliances, such as using Alexa and Brava.
These appliances are all connected to a smartphone or smart home device, which allows them to be controlled by you remotely.
This can be helpful for a variety of tasks, such as setting timers, checking on the status of the appliance, or even ordering groceries.
In the image above, we can see a refrigerator with Alexa built-in.
This allows you to use voice commands to control the refrigerator, such as asking it to add items to your shopping list or play music.
We can also see an oven with Brava technology.
This oven uses infrared heat to cook food quickly and evenly, and it can be controlled with a smartphone app.
Smart appliances are a growing trend in the home appliance industry.
They offer a variety of benefits, such as convenience, efficiency, and peace of mind.
If you are looking for ways to make your life easier and more efficient, smart appliances are a great option.
Here are some of the benefits of using smart appliances:
Convenience: Smart appliances can be controlled remotely, which means you can do things like set timers or check on the status of the appliance without having to get up from your chair.
Efficiency: Smart appliances can help you save energy and money. For example, a smart thermostat can automatically adjust the temperature of your home based on your schedule.
Peace of mind: Smart appliances can help you stay connected to your home, even when you're not there. For example, you can use a smart security camera to check on your home while you're away.
If you're considering adding smart appliances to your home, be sure to do your research to find the right ones for you. There are a variety of different brands and models available, so you're sure to find ones that fit your needs and budget.
Trending T-Shaped Islands

T-shaped islands offer a variety of benefits, such as:
More workspace: The T-shaped configuration provides more workspace than a traditional island, which is ideal for large families or those who cook often.
More storage: The T-shaped island can also be used to add more storage to the kitchen, which is always a valuable commodity.
More seating: The T-shaped island can also be used to add more seating to the kitchen, which is perfect for informal meals or entertaining guests.
Visual interest: The T-shaped island adds visual interest to the kitchen and can help to define the space.
If you are looking for a kitchen island that is both functional and stylish, a T-shaped island is a great option.
Here are some additional tips for choosing a T-shaped island for your kitchen:
Consider the size of your kitchen. If your kitchen is small, you may want to choose a smaller T-shaped island. This will help to make the kitchen feel larger.
Think about the style of your kitchen. If your kitchen is traditional, you may want to choose a T-shaped island with traditional styling.
Match the T-shaped island with the other cabinets and countertops in your kitchen. You want to create a cohesive look.
Don't be afraid to add some personality to your T-shaped island. You can do this with the choice of materials, finishes, or even accessories.
As we plan for 2024 and beyond, there are several exciting trends in kitchen design to consider for our next remodel such as oversized windows for natural light, latches on cabinets for safety, double islands for luxury, green cabinets to add personality, and smart appliances for convenience.
Natural materials like wood and stone are also popular for countertops and accents for an updated look.
Trends like these provide stylish and functional touches to any kitchen that can bring it to life.
Key Takeaways for kitchen trends:
1. Oversized windows, latches on cabinets, double islands and green cabinets are becoming trendy kitchen design features in 2024.
2. Smart appliances are being used for convenience and offer a variety of benefits such as setting timers and ordering groceries.
3. Natural materials, such as wood and stone are perfect for countertops and accents for a classic and timeless look.

Five Things to Consider Before a Kitchen Remodel
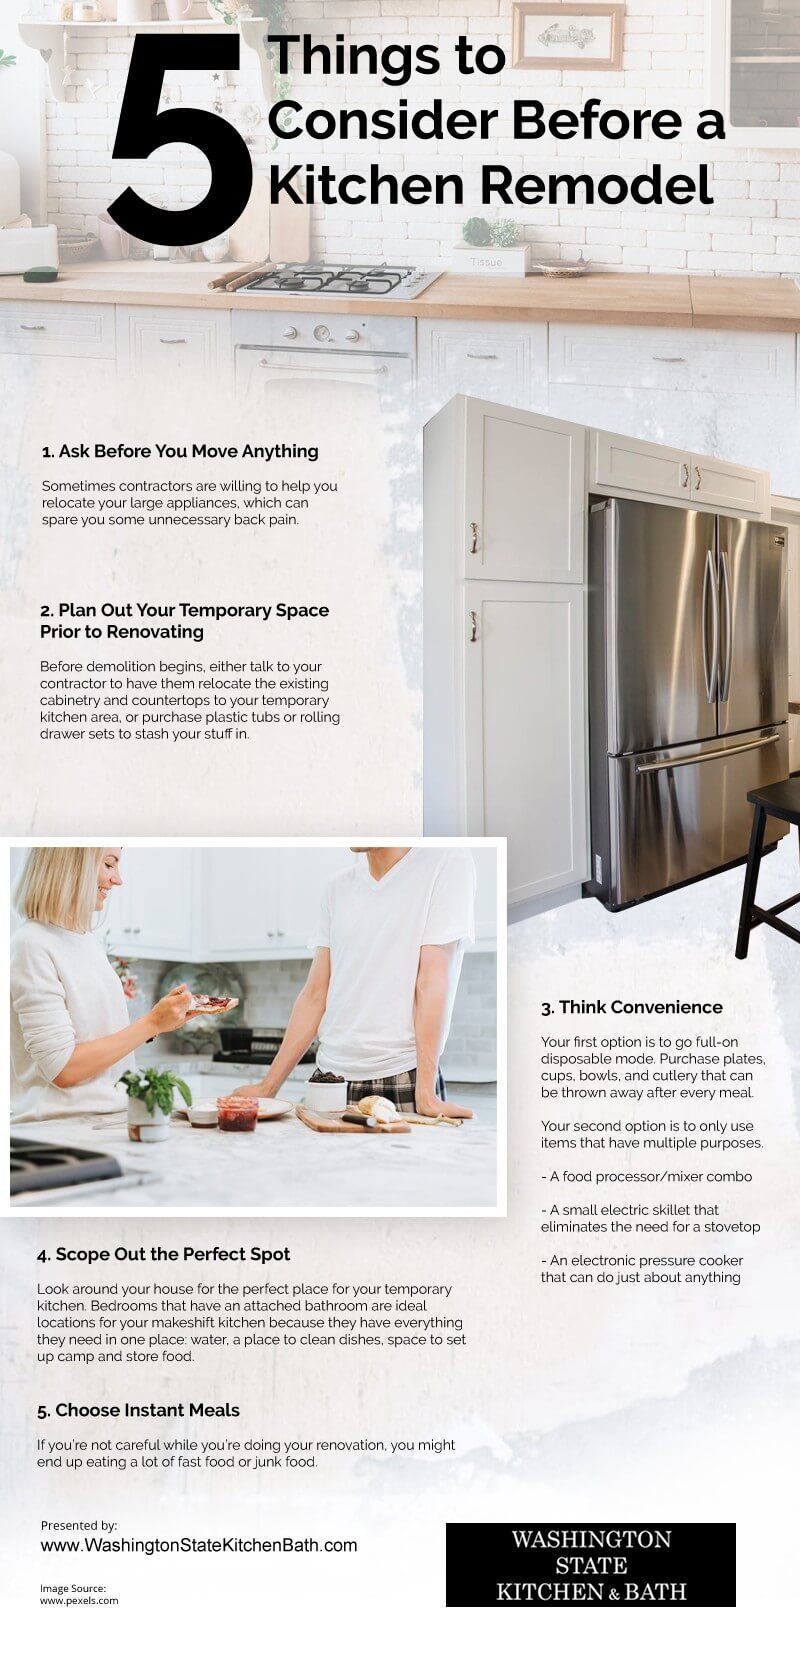
Wise Appliance Relocation
Prioritize your physical well-being by consulting contractors about relocating large appliances.
This could save you from unnecessary strain and back pain.
Strategic Temporary Setup:
Craft a temporary kitchen plan in advance.
Coordinate with your contractor to shift existing cabinetry and countertops to the makeshift kitchen area.
Alternatively, invest in rolling drawer sets or plastic bins for organized storage.
Convenience is Key:
Explore two options for meal prep ease.
a) Opt for disposable tableware for hassle-free cleanup after each meal.
b) Alternatively, embrace versatile tools like a food processor/mixer combo, an electric skillet that eliminates the need for a stovetop, and a multi-functional electric pressure cooker.
Ideal Location Scouting:
Identify an optimal spot within your home for the temporary kitchen.
Bedrooms with attached bathrooms offer the convenience of water access, dish cleaning, ample space, and storage, creating an all-in-one solution.
Swift Meal Solutions:
Guard against the temptation of excessive fast food consumption during renovations.
Choose instant meal options to maintain a balanced diet while your kitchen is under transformation.
By considering these strategic steps, you'll navigate your kitchen remodel with greater ease and ensure a smoother culinary journey throughout the process.

Kitchen Renovation Timeline
Kitchen renovations can be intimidating and worrying for clients, but they don’t have to be. To help, we’ve created this guide to the stages of a comprehensive kitchen remodel, outlining what to expect and how long each section should take. Whether you plan to complete the project yourself or employ a professional contractor, this timeline can help you prepare for the entire process from start to finish.
In general, a kitchen remodel can take anywhere from a few months to a year or more, depending on its complexity. It's a multi-staged process that typically includes:
• Gradual demolition/deconstruction
• Rough-in work (framing and plumbing)
• Professional assessment
• Building of walls
• Installation of doors and windows
• Placement of cabinets and piping
• Replacing appliances
• New flooring installation
While these steps are typical for most remodels, there may be slight adjustments that make sense given your particular project. With the right planning and guidance, you can ensure that your kitchen remodel is an enjoyable—and successful—experience.

Kitchen Design Planning: Recipe for Success (3-4 Weeks)
Cooking up your dream kitchen? Let's break down the planning phase into bite-sized pieces for a deliciously successful renovation.
📐 Design Your Kitchen (1-2 days+): Sketch your vision, then team up with a kitchen design pro to bring it to life. Dream big, and let expertise sprinkle its magic.
📝 Determine Your Kitchen Needs (1 day): Think about your kitchen's role. Who's cooking? What appliances do you crave? Planning ahead sizzles with smart questions.
🏡 Stay or Go (1 day): Sort out what's a keeper and what could use a refresh. A lick of paint or clever cabinet reshuffling can spice things up without draining your wallet.
💰 Budget (1 day): Know your numbers before you spice things up. Kitchen renovations range from $10,000 to $25,000. Sizzle smartly within your financial skillet.
📏 Measurements (1-2 days): Size matters! Accurate measurements ensure a perfect fit. Appliances, cabinets, and doorways – nail down every inch.
🏁 Layout (1-2 days): Whisk up a layout that flows. Allow space to dance and appliances to groove. Cook, clean, and create in a harmonious triangle.
🔲 Select Cabinet Styles (1-2 days): Cabinets that blend flair and function? Absolutely! Think about your cooking style and storage needs. Choose between custom and pre-fab, pick materials, and arrange wisely.
🛠️ Choose Finishes & Hardware (1-2 days): Hardware is the garnish. Choose knobs and handles that match your vibe. Test for feel, then spice with brushed, polished, matte, or painted finishes.
👷 Consult With Contractors (2-5 days): Team up with the pros. Your design dreams turn real as the project manager and contractors take center stage.
📝 Apply For Building Permits (1-2 weeks): Get the green light! Permits ensure a smooth kitchen symphony, with safety and standards dancing in perfect harmony.
Remember, a well-prepared plan is the secret ingredient. Blend style, function, and a dash of expertise for a kitchen that's both delectable and dazzling!
Kitchen Remodel Buying & Prep Phase (3 to 4 Weeks)
Ah, the buying and prep phase of your kitchen remodel journey – an exciting yet challenging stretch! Allow me to simplify this process so it's as clear as a freshly wiped countertop.
📦 Step 1: Cabinet Chronicles (3-5 days): Let's dive into cabinets! Your budget sets the stage. So, learn about cabinet features and materials. Balance quality and cost. Cabinets come in stock, custom, and semi-custom flavors. Don't hesitate to seek pro advice for sizing and quality cues.
💡 Step 2: Appliance Adventures (3-5 days): Appliances are your kitchen's besties. List must-have features. Cook up your cooking style. Think ranges, ovens, fridges, and more. Prioritize your needs to shop like a pro.
💡 Step 3: Light Up Your Life (1-3 days): Lights, camera, ambiance! Your kitchen needs four lighting levels: ambient, task, accent, and decorative. Transform your space with luminous charm. Think ceiling light, countertop glow, and style-upping dazzlers.
🌟 Step 4: Design Magic (3-5 days): Flooring, countertops, and hardware, oh my! Choose kitchen flooring based on traffic and budget. Countertops? It's all about appearance, texture, and maintenance. Hardware adds your signature touch. Choose wisely, style maestro.
📦 Step 5: Space Prep Ballet (1-2 days): Clear the decks! Cabinets and countertops should have a solo dance. Store or shuffle furniture. Bid adieu to mirrors and artwork. Embrace an organized emptiness.
🔍 Step 6: Inspector Gadget (1 day): Inspect arrivals with a keen eye. No lemons allowed. Your precious haul of cabinets and appliances deserves a flawless debut.
🍳 Step 7: Temp Kitchen Theater (5-7 days): A temporary kitchen, your cooking oasis! Think basic appliances, proper ventilation, and distancing from the hustle-bustle. Opt for laundry room bliss if available. Safety first, tasty dishes second.
🗄️ Step 8: Stash & Dash (1 day): Stock up your temp kitchen. Think microwaves, toaster ovens, and handy helpers. Cooking in style, even without a full kitchen!
Remember, this phase dances to your rhythm and wallet's beat. Make it a masterpiece, maestro!
Kitchen Construction: Crafting Culinary Comfort (1-2 Months)
Ready to cook up your dream kitchen? The construction phase, simmering for 1 to 2 months, brings your vision to life. Let's break it down into delectable bites.
🔨 Demo The Kitchen (2-3 weeks): Clear the canvas! Gradually deconstruct the old to make room for the new. Out with the outdated, in with the invigorating. A professional touch ensures safety and precision.
🧱 Install Walls, Windows, & Doors (1-2 weeks): Build the stage! Drywall dances into place, forming the backdrop. Doors and windows join the ensemble. Seal gaps for energy efficiency and precision cabinet fit.
🔧 Rough-In Construction (3-5 days): Inner workings come to life. Plumbing and wiring weave their magic behind the scenes. Get inspection-ready with outlets, fixtures, and controls in place.
🎨 Paint Walls (2-4 days): Brush on personality! Fresh paint elevates your space. Choose hues that reflect your style. Transform in a mere 2 to 3 days.
🏞️ Install Flooring (2-3 days): Set the foundation. Flooring glides in before cabinets take the spotlight. From hardwood to marble, choose a style that resonates with you.
With each step, your kitchen takes shape. The construction symphony plays on, crafting a culinary haven that's as functional as it is fabulous.
Kitchen Finish Construction: Crafting Culinary Haven (4-6 Weeks)
Your kitchen transformation is in its delicious final phase, simmering for 4 to 6 weeks. Let's savor each step that brings your masterpiece to life.
🔨 Install The Cabinetry (3-5 days): After the electrical dance, it's cabinetry time! In 3 to 5 days, cabinets take their spotlight, creating kitchen harmony.
🪚 Install Countertops (1-2 weeks): Countertops take shape, following cabinet symphony. Template to reality, within a week. Precision crafted, they complete the masterpiece.
💡 Install Light Fixtures (2-3 days): Light up your world! Add ambient, task, decorative, and accent lights in 2 to 3 days. Illuminate your kitchen story.
🚿 Install Plumbing Fixtures (2-3 days): Plumbing joins the mix. Sinks, faucets, and more find their places in 2 to 3 days. Precision ensures a watertight performance.
🥘 Install Kitchen Appliances (1-2 days): Appliances take their places. Microwave, stove, fridge - the kitchen ensemble is complete. Even premium extras like wine chillers find their spot.
📏 Level Appliances (5-7 hours): Balance the dance. Level appliances ensure longevity and smooth operation. Fine-tuning in 5 to 7 hours guarantees a harmonious kitchen.
🧪 Test Appliances (1 day): Safety check! Test electrical wonders to prevent mishaps. Keep the spark, minus the shocks. Leave no risk unchecked.
🗜️ Install Cabinet Hardware (2-3 days): The final flourish! Cabinet hardware graces your cabinets in 2 to 3 days. Refresh or renew - the choice is yours.
🎨 Touch Up Paint (7-10 hours): A painter's final touch. Blend old and new with a 7 to 10-hour paint touch-up. Seamlessly merge colors for a polished finish.
🔍 Meet Building Inspector (If Needed) (1 day): Inspector's nod. If a permit's in play, meet the inspector. Ensure codes are embraced, craftsmanship applauded.
🧹 Clean Up The Site (1-2 days): Ready for the grand reveal! Sweep away remnants. Bins and clutter bow out, leaving a pristine culinary stage.
As the curtain rises on your newly remodeled kitchen, every detail is in place. A masterpiece of design, craftsmanship, and care awaits your culinary dreams.
Ideal Times for Kitchen Renovation: A Recipe for Success
Timing is key when brewing a kitchen renovation. Let's simplify the best moments to dive into your remodel, ensuring a smoother experience.
🌞 Calmer Periods: Choose peaceful waters. If your schedule permits, plan during tranquil times. Avoid adding renovation stress to a bustling routine. Many opt for summer when flexible schedules soothe the process.
🍽️ Alternative Dining Plans: Savor smarter dining solutions. While your kitchen transforms, explore options like mini-fridges, microwaves, or outdoor barbeques. Warmer months offer outdoor cooking charm.
🌦️ Favorable Weather Conditions: Watch the forecast, especially in colder regions. Indoor projects shine year-round, while outdoor changes prefer milder climates. Snowy days can mean savings but need storage and space.
💰 Seasonal Sales & Discounts: Score savings with savvy shopping. Time your buying spree for sales like Black Friday or spring discounts. Grab materials early to keep your project on track.
🎉 Special Occasions & Holidays: Set sights on celebration! Plan 6 months ahead for a dazzling kitchen before the big event. Factor in potential delays for smooth sailing.
📦 Lead Times for Products: Ingredients matter. Custom items demand lead time. Begin organizing early to avoid hitches. Custom-order components can be stars of your remodel show.
Source: DesigningIdea.com
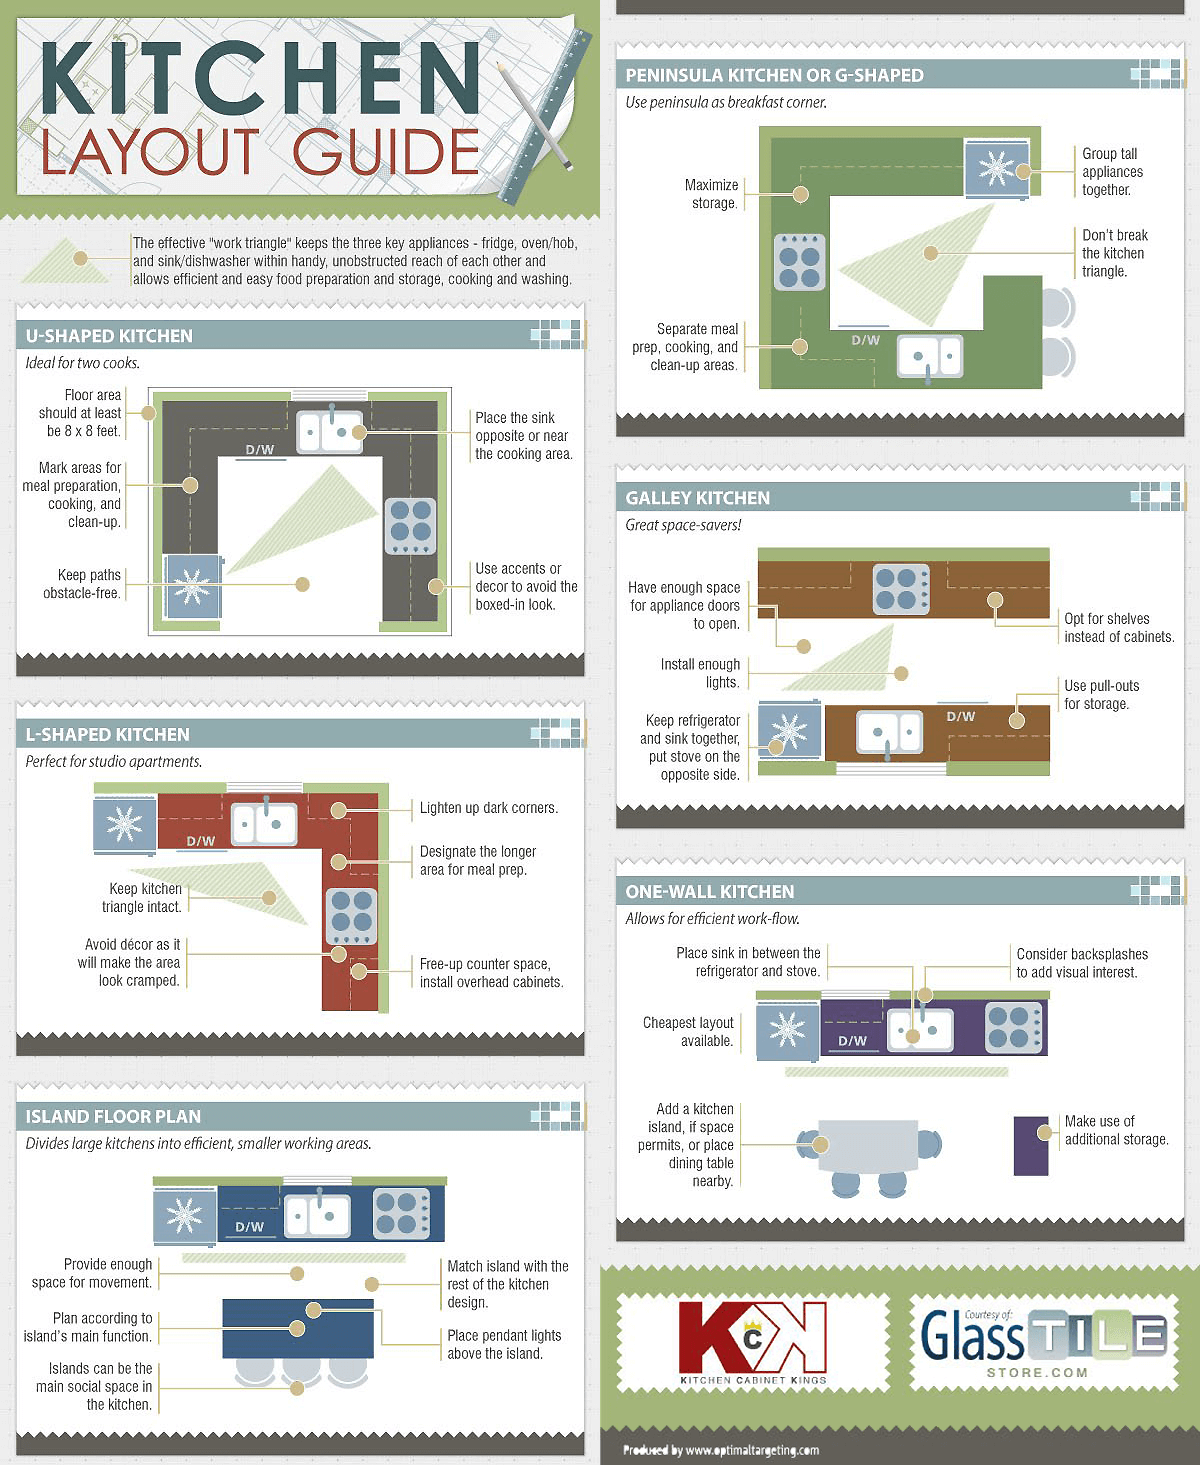
Popular Kitchen Layouts
The concept of a functional "work triangle" places the essential appliances—refrigerator, oven/stove, and sink/dishwasher—within convenient reach of each other, facilitating efficient food preparation, cooking, and cleaning.
The following infographic discusses these kitchen layouts:
A U-shaped kitchen layout suits two cooks well.
An L-shaped layout is ideal for studio apartments.
Island floor plans divide larger kitchens into efficient workspaces.
A G-shaped kitchen can double as a breakfast counter.
A galley layout is excellent for saving space.
A one-wall kitchen enables an efficient workflow.
1. U-Shaped Kitchen

source: christine sheldon design website
A U-shaped kitchen is a design that embraces efficiency and elegance, forming a layout in the shape of a "U." It's a culinary haven where functionality and style converge.
Here's the essence of a U-shaped kitchen:
🍽️ Three Sides of Glory: Imagine three walls forming the U-shape, creating a cozy and contained cooking area. This layout is perfect for maximizing workspace and storage.
🧊 Efficient Work Triangle: The U-shape optimizes the work triangle—the dynamic relationship between the sink, stove, and fridge. Effortlessly move between prep, cooking, and cleanup, making your culinary journey smooth.
🧉 Ample Storage: Utilize all three walls for storage cabinets and countertops. From pots and pans to pantry items, everything has its place, minimizing clutter and keeping your space organized.
🍴 Versatile Counter Space: Spread out with ample counter space on all three sides. Whether you're chopping, mixing, or plating, a U-shaped kitchen ensures you have room to work your magic.
🔆 Bright & Airy: Natural light dances in from multiple directions, brightening up your cooking endeavors. Add in well-placed lighting fixtures to keep the U-shaped kitchen well-lit day and night.
🍳 Social Hub: The open end of the U invites social interaction. Guests can engage with you while you cook, transforming your kitchen into a hub of conversation and camaraderie.
🍽️ Dining Delight: For those who cherish in-kitchen dining, consider adding a peninsula or island at the open end. It provides seating and transforms your U-shaped kitchen into a cozy eating spot.
2. L-Shaped Kitchen

Concept photo: American Pro Concepts via Home Depot
Ah, the L-shaped kitchen layout, a classic culinary canvas! Imagine a kitchen design that fits snugly into the corner of your space, forming an "L" shape. This layout combines functionality and aesthetics, making it a popular choice for many homes.
Here's the flavor of an L-shaped kitchen:
🍳 The Basics: Picture two adjacent walls forming the L-shape. One wall usually holds the sink, fridge, and countertops, while the other showcases the cooking range and more counters.
📐 Space Maximization: The L-shape optimizes corner space, making it efficient for cooking, prepping, and cleaning. It creates a compact, functional hub, ideal for both small and medium-sized kitchens.
🍽️ Work Triangle Magic: The work triangle—formed by the sink, stove, and fridge—is effortless in an L-shaped kitchen. This setup ensures a smooth flow between cooking, prep, and storage areas.
🎨 Customization Galore: Whether you're a culinary artist or a weekend chef, the L-shape offers versatile customization options. Add an island for extra prep space or a casual dining spot, turning your kitchen into a social hub.
🌞 Natural Light Brilliance: Maximize natural light with well-placed windows along one wall of the "L." It's a chef's dream to work bathed in sunlight.
🧺 Clever Storage: Capitalizing on corner cabinets, an L-shaped layout offers creative storage solutions. Pull-out shelves, lazy Susans, and corner drawers optimize space.
🍽️ Social Cooking: With one open side, an L-shaped kitchen invites conversation. Chat with guests while you whip up your culinary creations.
3. Island Floor Plan

An island kitchen floor plan is a design that adds a versatile and functional centerpiece to your culinary domain. This layout features a freestanding countertop or cabinet unit, known as an "island," placed within the kitchen space.
Here's a taste of the island kitchen floor plan:
🏝️ The Star of the Show: Imagine a standalone island positioned within the kitchen area. It's not just an extra counter; it's a multitasking marvel.
🍳 Cooking & Prep Haven: The island becomes a prime spot for meal prep and cooking. With additional workspace and perhaps a sink or cooktop, it elevates your kitchen's efficiency.
🥂 Social Gathering Spot: An island isn't just functional—it's a social hotspot. Guests can gather around, chat, and even lend a hand while you create culinary delights.
🍴 Dining Delight: Add barstools or seating on one side of the island, and voila! You have an in-kitchen dining spot. It's perfect for quick meals or casual get-togethers.
💡 Ample Storage: An island isn't just about its surface. It offers concealed storage with cabinets and drawers, keeping your kitchen organized and clutter-free.
🔆 Lighting Elegance: Illuminate your island with pendant lights or stylish fixtures, making it a focal point that shines both day and night.
🎨 Design Element: The island can complement your kitchen's design, serving as a showcase for unique materials, colors, or patterns.
🍸 Beverage & Snack Station: Transform your island into a mini bar or snack station, perfect for entertaining or serving up drinks and appetizers.
4. G-Shaped Kitchen

Designer: Asha Maxey of Asha Maía Design
A peninsula or G-shaped kitchen is a culinary masterpiece that blends the efficiency of a U-shaped layout with the versatility of an island. It's a design that offers ample workspace, storage, and a touch of social charm.
Here's a glimpse of the peninsula or G-shaped kitchen:
🏝️ An Extended U: Imagine a U-shaped kitchen with one end extended, forming a peninsula. It's like an island connected to the main cabinets, creating a seamless flow.
🥘 Abundant Workstations: With three sides and the peninsula, you have abundant counters to chop, mix, and prep. It's a cooking paradise designed for efficiency.
🍴 Casual Dining: The peninsula serves as an in-kitchen dining area. Add barstools to the extended end, and you have a cozy spot for meals and conversations.
🎉 Social Hub: This layout invites social interaction. Guests can perch at the peninsula, chatting while you cook, making your kitchen a lively gathering space.
📦 Storage Heaven: Cabinets and drawers line the U-shaped section and the peninsula, offering plenty of storage for cookware, utensils, and pantry items.
🔆 Lighting Brilliance: Pendant lights over the peninsula add a touch of elegance and provide focused task lighting, making your kitchen shine day and night.
🍹 Beverage Center: Transform the peninsula into a beverage station or mini bar. It's ideal for mixing drinks, serving snacks, and keeping the party flowing.
🔍 Visual Separation: The peninsula can act as a subtle divider between the kitchen and adjacent areas, creating visual separation while maintaining an open feel.
The peninsula or G-shaped kitchen takes your culinary space to new heights, combining practicality, style, and a dash of conviviality. It's a layout that caters to both your cooking and social needs.
5. Galley Kitchen

A galley kitchen is a streamlined and efficient kitchen layout that's designed for functionality in a compact space. It's named after the narrow kitchens found on ships, where space optimization is key.
Here's a glimpse into galley kitchen features:
🚢 Parallel Perfection: Imagine two parallel walls lined with cabinets, appliances, and countertops. The galley layout maximizes every inch of available space.
🍳 Efficient Workflow: The galley kitchen creates a seamless workflow with the "work triangle" – sink, stove, and fridge – within easy reach. It's perfect for quick and efficient cooking.
🧺 Ample Storage: Cabinets on both walls provide plenty of storage, keeping cookware, utensils, and ingredients at your fingertips.
🍽️ Linear Layout: The linear arrangement means everything is within arm's reach. No need to navigate around a sprawling kitchen – it's all right there.
💡 Focused Lighting: With a narrow layout, lighting can be well-focused. Task lighting under cabinets and pendant lights above create a well-lit workspace.
🥗 Minimalist Charm: The galley kitchen's simplicity lends itself to a clean and modern aesthetic. It's a great canvas for sleek design.
🥘 Cooking Symphony: It's easy to orchestrate a cooking symphony in a galley kitchen – everything is conveniently positioned for each step of the process.
📐 Space Saver: Ideal for small apartments or homes with limited kitchen space, the galley kitchen makes the most of what you have.
The galley kitchen is a space-efficient powerhouse, providing a practical and organized setup that's perfect for busy cooks and cozy spaces.
6. One Wall Kitchen

A one-wall kitchen is a streamlined and efficient kitchen layout that maximizes space by organizing all key elements along a single wall. It's a minimalist and space-saving design that's perfect for small homes or open-concept living areas.
Here's a snapshot of the one-wall kitchen:
📏 Single Wall Brilliance: Imagine all kitchen elements – sink, stove, fridge, cabinets, and countertops – aligned along one wall. It's a compact and functional layout.
🍽️ Efficient Flow: With everything within arm's reach, the one-wall kitchen promotes an efficient and smooth workflow, making cooking and prep a breeze.
📚 Space Optimization: Perfect for small apartments or open layouts, the one-wall design minimizes the kitchen's footprint, leaving more room for living and dining areas.
🧺 Vertical Storage: Cabinets and shelves can extend all the way up to the ceiling, maximizing vertical storage and keeping everything neatly organized.
🍳 Sleek Aesthetic: The streamlined layout lends itself to a sleek and modern aesthetic. It's a canvas for minimalist design and creative touches.
🔆 Focused Lighting: Task lighting becomes crucial in a one-wall kitchen. Under-cabinet lighting and well-placed fixtures ensure a well-lit and functional workspace.
🍴 Casual Dining: Add a foldable table or bar stools to the opposite side of the wall for in-kitchen dining, creating a cozy and convenient eating spot.
🔨 Easy Maintenance: With everything on a single wall, cleaning becomes a breeze. No need to navigate around multiple corners or obstacles.
The one-wall kitchen is a compact powerhouse that makes the most of limited space, creating a functional and stylish cooking hub that seamlessly integrates into your living area.
The layout of a kitchen plays a pivotal role in its functionality and aesthetics. Whether you're considering a U-shaped, L-shaped, island, G-shaped, galley, or one-wall design, careful planning is essential. A U-shaped kitchen, with its well-defined areas for cooking, meal preparation, and cleanup, can be optimized with the right placement of the sink and thoughtful decor choices. In contrast, an L-shaped kitchen should prioritize maintaining the work triangle and avoid overcrowding with excessive decor. An island layout, when well-designed, can serve as the heart of social interaction in the kitchen, but it requires careful spacing and lighting considerations. For a G-shaped kitchen, focus on maximizing storage space and maintaining the work triangle. In a galley kitchen, ensure door space, proper lighting, and a well-organized setup to make the most of the available space. Finally, a one-wall kitchen, while cost-effective, benefits from a well-placed sink, creative storage solutions, and additional freestanding storage options. Overall, a kitchen's layout should harmonize practicality with style, making it a functional and visually appealing space in any home.
How To Compromise On Your Kitchen Design + Expert Tips

Source: Kitchen Cabinet Kings
If you're planning a kitchen remodel with your partner, it's important to find ways to compromise and work together. To help with this process, we've gathered advice from counselors and couple's therapists on how to navigate disagreements and find common ground when it comes to interior design. Our infographics provide step-by-step guidance and worksheets to make the process of designing your dream kitchen a smooth and stress-free experience for both you and your partner.
Compromising on kitchen design can be a challenging but necessary task, especially when multiple family members have different preferences and needs. However, with expert tips, you can create a kitchen that suits everyone while maintaining functionality and aesthetics.
Prioritize Needs vs. Wants: The first step in compromising on kitchen design is to distinguish between essential needs and wants. Identify what elements are non-negotiable for each person. For instance, the home chef may prioritize counter space and high-quality appliances, while someone else might value a large dining area.
Work with a Professional: Consulting a professional kitchen designer can be a game-changer. They can offer objective advice, find creative solutions, and suggest design elements that meet everyone's needs. Their experience can help navigate potential conflicts.
Open Communication: Effective communication is key. Everyone involved should express their preferences and concerns openly. Create a collaborative atmosphere where compromises are viewed as solutions rather than sacrifices.
Functional Zones: Divide the kitchen into functional zones. For example, separate cooking, cleaning, and food prep areas. This can help allocate space and features more efficiently, addressing individual requirements within the shared space.
Customization and Personalization: Look for ways to personalize specific areas of the kitchen. This can include designating a section for someone's favorite herb garden, unique storage solutions, or even a decorative wall that reflects individual tastes.
Aesthetics and Finishes: Compromising on aesthetics can be challenging. However, you can achieve a harmonious design by selecting a neutral or versatile color scheme and then allowing each person to add personal touches or accents.
Flexibility in Appliances: Opt for versatile appliances that cater to various cooking styles. For example, a combination microwave-convection oven can be a great compromise between traditional and microwave cooking preferences.
Consider Future Needs: Think about the long term. What works for everyone now may not in the future. Make sure the kitchen design is adaptable and can accommodate changing family dynamics or needs.
Mock-Up or Virtual Design: Visualize the design through mock-ups or virtual design tools. This can help everyone see how the kitchen will come together, making it easier to reach compromises that satisfy everyone's requirements.
Trial Period: Sometimes, a trial period can be helpful. Implement the design, by using painter’s tape to outline the new design, for a few weeks or months to see how well it works for everyone. This can provide valuable feedback for adjustments.

Remember, compromising in kitchen design is about finding solutions that accommodate everyone's needs and create a space that is not only functional but also a joy to use. Expert advice and open communication are invaluable in achieving a well-balanced kitchen that brings satisfaction to all members of the household.
How to Stay On Time and Under Budget for Your Kitchen Remodel

Consolidatedfoodservice.com
Remodeling your kitchen can be a stressful, expensive, and time-consuming project, but it is possible to do it on time and under budget. Here are some tips:
To finish on time:
Create a detailed schedule before work begins.
Work with a contractor who has experience in kitchen remodels.
Be realistic about the scope of the project and the time it will take.
To stay on budget:
Consider refinishing your existing cabinets instead of replacing them.
Choose timeless appliances and finishes.
DIY tasks that you are comfortable with.
Set aside extra funds for unexpected expenses.
To thrive during the remodel:
Plan to eat out more often.
Set up a temporary food prep station in another room of your home.
Stock up on disposable plates and easy-to-prepare meals.
Consider adding a temporary sink.
Here are some additional tips that may help you save money and time on your kitchen remodel:
Shop around for the best deals on materials and appliances.
Consider buying used cabinets and appliances in good condition.
Do your own demolition work if you are comfortable with it.
Be flexible with your design and willing to make changes if necessary.
Conclusion

Making the decision to remodel your kitchen can be daunting, but with the help of informative and visually appealing infographics, homeowners can easily see their options, plan their layout, and stay on track with their timeline.
Infographics can help provide everything from budget breakdowns to kitchen features and design guidelines.
Ultimately, infographics can help you create a kitchen that fits both your style and budget, elevating your home and giving you a space you can enjoy for years to come.
So don't wait any longer – with the help of infographics, you can make your dream kitchen a reality.
Related Posts:

Schedule Your Complimentary Discovery Call
Looking to remodel your kitchen? Let’s hop on a free discovery call! Plus, download our curated collection of helpful infographics to save these inspirations and ideas on how to transform your kitchen.


Affiliate Disclaimer
Shop My Finds
Trending Articles


Copyright Act of 1976 Section 107 Fair Use Disclaimer
More Inspiration
If no images appear under “More Inspiration,” please refresh the page. Thank you.